What Equipment Do I Need to Connect to The Internet?
Learn about all the different types of networking equipment and which ones you need to make sure your internet works efficiently and securely.
If you have an old router lying around, don't just throw it in the trash, learn how to turn it into strong Wi-Fi.
Everyone has suffered through low Wi-Fi signals. Wireless signals degrade pretty quickly through walls, floors, and other objects. Sometimes your Internet Service Provider (ISP) has really, really inconvenient places to connect their gear inside your apartment, so it doesn’t always provide the quality you need. No matter the cause, you might already own hardware that can fix your Wi-Fi problems.
Run an Ethernet cable to a different part of your home that suffers from poor signal strength and turn your old Wi-Fi router into a new wireless access point. Now that we’re on the same page about the multifunction nature of your home equipment, you can use the hardware you own to keep those buffering breaks at bay.
Most home Wi-Fi routers have the same functions, but their control interfaces don’t always look alike or use the same phrasing. Sometimes even the same model in a different revision uses different software. It can help to do some web searching for your specific brand. Keep it simple but pointed: “netgear default password” or “factory reset linksys e3000”
Your mileage may vary. Sometimes signal strength isn’t the problem, too much or too powerful Wi-Fi can be worse than not enough. Use tools like ‘Wi-Fi Analyzer’ from the Play Store to help – unfortunately, I’m not aware of any apps for iPhone. (But you can use your laptop!)
If you’re thinking about trying this for your business, consider how much you use Wi-Fi and the Internet for things that directly impact your bottom line – professional services can quickly be covered by potential lost revenue or efficiency improvements. Summit Technology services networks tailored to your business, from two-person teams to enterprise-level networks. Instead of going through the hassle of building your own for your business, you can just have us do it, just putting that out there...
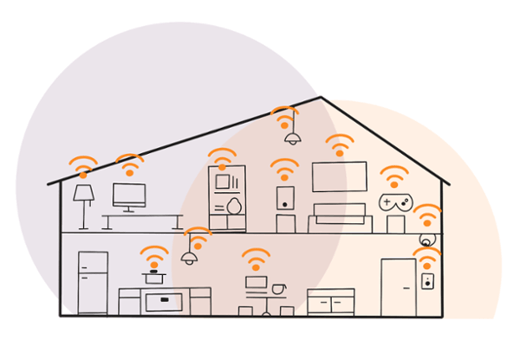
Well, reconfiguring something you already have into something useful can be a fun project and learning experience. This post may seem intimidating, but that’s mostly due to the number of router brands and your own specific home layout. In the end, you only need to change a few settings and plug it in. Everything below can be accomplished in an afternoon by anyone who knows how to use a web browser and a search engine, maybe a weekend if you go all out with your cabling. If you’re considering an upgrade anyway, the only additional cost would be a cable. (We don’t recommend wireless mesh systems in most scenarios.)
There are also other ways to improve your Wi-Fi experience at home - you can purchase a Small Office/Home Office (SOHO) dedicated wireless access point instead of repurposing your old stuff. It probably will give you the best upgrade, but with less fun (and probably less headache). Even if you buy something new and dedicated instead, use the cabling tips below and follow the manufacturer's instructions to set up your new AP.
Your home office on the other side of the house from your primary Wi-Fi router is a perfect candidate – you can plug your computer into the Ethernet ports on the back, as well as anything like a printer, smart light controller, or TV. Turn off the Wi-Fi on these devices you hardwire to clear the airtime. More airtime = more speed.
If you can’t get a network cable to where you need a boost, it gets a lot harder to set up a quality wireless access point. Handy people who own homes could have an easy time with this part – lucky them! Those who rent or don’t have great cable pathways might have some more trouble. Check out this shopping list while you evaluate your options. You can usually get everything you need from a hardware/home improvement or electronics store.
Cables. They come in the premade fashion (with varying lengths) or on a spool with no connectors – also in various lengths, but you can cut to size.
Get at least CAT5e, but spring for CAT6 for better shielding and reliability if you have high-end equipment.
There’s nothing wrong with premade cables, as long as it's more than if the length you need plus 10% (but not too much more, or you won’t have an easy time making it look pretty).
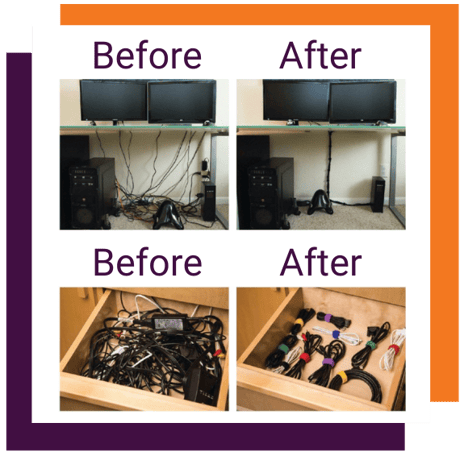
Cable management. A bit of velcro and a well-placed floor runner can make your job look professional and keep it from being a tripping hazard. Ask the guy at the home improvement store for suggestions for hiding your cable.
Try to run your cable between the carpet and the baseboard if possible
You might be able to run a cable through your air vent to cut the distance and easily hide it
If you need to run up the wall, go behind a bookcase or something tall.
Cabling tools, if you decide to make your own.
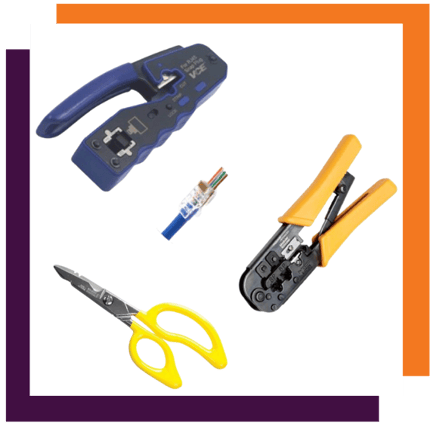
Left: Passthrough RJ-45 crimper. Right: Standard RJ-45 crimper
Bottom: Cabler’s snips.
Get at least (10) RJ-45 connectors - trust me, you’ll need more than 2 if you don’t do this often. Get passthrough connectors if you have a passthrough crimper.
A good pair of cabler’s snips. A knife or kitchen scissors do the job, but snips are easier are safer.
Optionally, a cable tester. I test short cables because I have a tester, but if your long cable isn’t working, you’ll want to know if you need a new long cable or just to re-crimp it. For projects like cabling Ethernet throughout your entire home or maintaining your lab rack, this tool is indispensable.
It might take more cable than you think to go along the walls and into corners. Try using a spool of string or a long extension cord that you know the length of to measure how long of a cable you need. Lay it along the path your cable would take, then measure it 5 feet at a time against a measuring tape or by counting how many times you used your predefined length. Then add an extra 10% to make sure everything reaches and there’s enough slack to work with. By the end, your cable can be no longer than 325 feet. (or 100m, per the Ethernet standard.)
If your picked-out location is over-distance, you’ll have to decide on a new location or a new, shorter pathway.
While you’re at the store getting cable, check out a surge protector – especially if you haven’t replaced yours in a few years or if they’ve suffered power fluctuations like when the power goes in and out in a storm. I recommend all computer and network equipment be connected to quality surge protectors – not just a power strip that doesn’t offer protections or warranties.
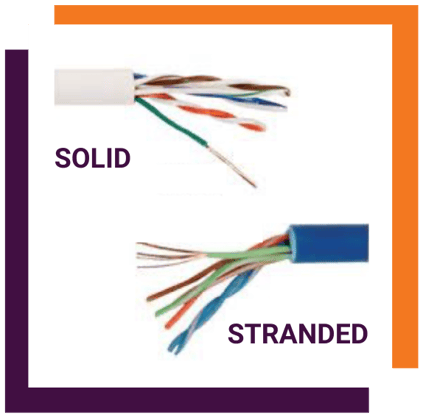
If you’re going to cut and crimp your own cable, make sure you don’t start with the premade variety. Premade cables use stranded wire instead of solid. Stranded wire isn’t made to be cut and re-crimped, and even professionals have a hard time getting a solid connection while re-crimping a premade cable. Don’t use things like wire nuts or try to splice a network cable for the same reasons, even with solid wires. Always make one continuous run of cable – if you only have 10 feet left but need 15, you should go get 15 feet worth of cable, not try to splice 5 feet onto the 10 you have.
If you want to try making your own cable but are a little nervous then just do a quick web search to find a quick video or article to help you out.
It’s a pretty easy process – remove the outer sheathing and the Kevlar strengthening member, unwind the wires and put them in the right order, put the jack on, check your wires didn’t change position and crimp.
Whether you decide to go with a premade cable or to attempt cutting and crimping your own, once you have a cable from your router to your dead zone, you can start configuring.
Tip: have your phone or a different computer connected to your other Wi-Fi ready so that you can do a search on the web if you have questions.
Connect the old router to a power source and to your computer using a network cable. You can do this over Wi-Fi, but some of the steps may boot you off and force a reconnect. Don’t connect anything else until you’re done configuring it. You’ll need to know how to use a web browser to log into your router control panel which, is usually located at http://192.168.1.1 - Here are a few links from popular router manufacturers for how to log into them. Usually, this info is on the bottom of your router, too.
Netgear: https://www.netgear.com/home/services/routerlogincom/
Belkin - https://www.belkin.com/us/support-article?articleNum=8181
If your router isn’t listed here, just do a search for “brand router login page”. Most of the time when my aunt calls me for Wi-Fi advice, I do a similar web search. (Don’t tell her!)
“Uh-huh. It says wrong password? The password is” [sounds of keyboard clacking] “on the bottom of your router. Yeah, the one in the dining room. Yeah, it says “Wi-Fi router” on the top. Uh-huh, the label says ‘Wi-Fi Network Password’, and then the password. No problem, you’re welcome.”
The first step is to disable the DHCP server. It’s probably under the LAN tab, but you may need to venture into the Advanced Settings to find it.
Dynamic Host Configuration Protocol (DHCP) makes it so that we can add and remove devices from a network whenever we want by automatically (or “dynamically”) allocating IP addresses to devices that request them.
Before DHCP, you had to manually configure and track unique IP addresses for every device on the network with pen and paper, a spreadsheet, or labels on devices.
We’re disabling the DHCP server on this router because your main router also runs one. Generally, you only want one DHCP server per LAN, though it doesn’t really matter where it runs most of the time.
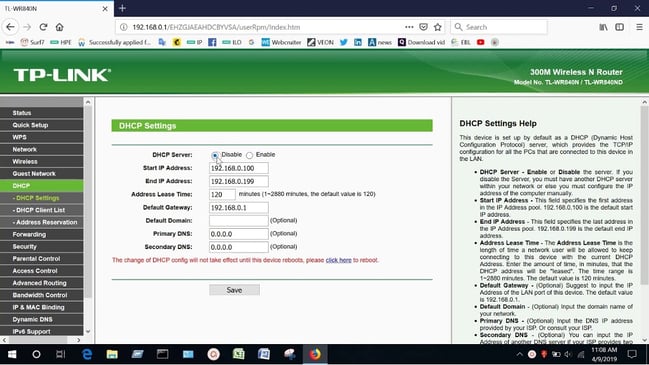
Example: Disabling DHCP on a TP-Link WR840N
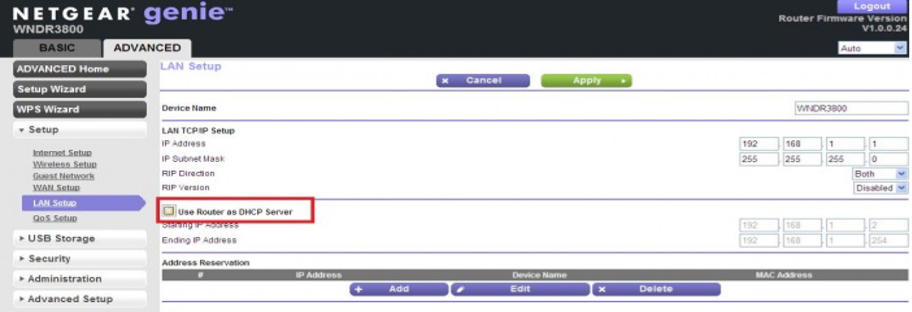
Example: disabling DHCP on a Netgear WNDR3800
The network name, or SSID, can be left as is or copied from your primary router.
For more control (but requires more action when you roam) make them different. You may need to manually pick your new office AP when you roam to your new AP if your phone/laptop can still see the weaker AP
For automatic switching (but possibly not roaming properly) make them the same. You might need to turn the Wi-Fi off and on to connect to the AP with a stronger signal if your device doesn’t automatically.
You can change this after the installation is complete! Try one way, and if it doesn’t work, come back and try the other way.
Change the channel on both your primary router and access point so that they’re different to avoid interference.
We don’t recommend using “Auto”, which is the default on most devices
We DO recommend coming back every 6 months or so and surveying to see if you need to pick a new (less used) channel.
To learn how to survey your home to see which Wi-Fi channels you should use, subscribe to our blog and check out the post on supercharging your home Wi-Fi.
Most of the other settings should be left default without further surveying.
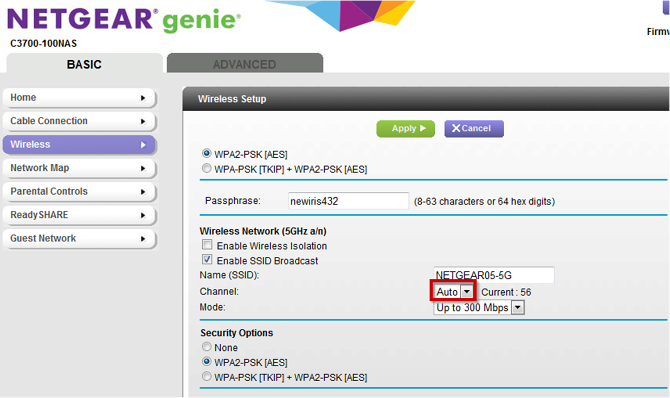 Example: Changing the channel on a Netgear router
This is probably on the same page as or nearby the DHCP settings. Check under LAN or Network Settings.
The default LAN IP address of most routers is 168.1.1. Since there will be two of them, you’ll want to change the last number on your second router to something different, between 2-254. Most of the time 192.168.1.2 is a good choice. (Keep the other IP settings the same.)
If your primary router has a different LAN network configured, mirror the settings for IP address and default gateway to your secondary access point then change the last number as above. The subnet mask field should match as well but probably won’t need to be changed.
You can find the default network settings for your primary router on the bottom label, on the manufacturer’s website, or by checking the network properties on your device you have connected to the Wi-Fi that you’re using for web searches.
This step is important because your devices might accidentally try to use this second router as a gateway to the internet if it has the .1 address instead of your main router.
You’ll be disconnected once you click save/reboot. Reconnect to the device on the new IP address you just gave it.
Once your router finishes rebooting, you should be done! Reconnect to your router’s dashboard and verify the IP address and DHCP settings saved. If everything looks good, connect your cable to one of the LAN ports, which are probably numbered. Don’t connect it to the WAN or Internet port – this would put an additional firewall between your new Wi-Fi and your primary router which could impact things like printing, smart home device control, and casting.
Check the signal strength of the Wi-Fi next to your new device, while connected to the old Wi-Fi. You may need to unplug your new Wi-Fi for a moment to force your device if you mirrored the SSID. It should be a low signal obviously. Connect to the new network, verified by a strong signal strength. You might need to restart the network adapter on your test device to force the shift. If you can reach the internet, wrap it up and enjoy the upgrade!
Talk to us about how we can find you a solution that is Simple. Convenient. Secure.
If you still have questions about routers or Wi-Fi, you can contact us at learnmore@greatservice.com or fill out our contact us form.
Learn about all the different types of networking equipment and which ones you need to make sure your internet works efficiently and securely.
Wi-Fi heat maps show the signal strength and coverage of a building's Wi-Fi network. How could these maps help improve your Wi-Fi network?
Modern data centers have shifted from traditional on-premises, physical servers to virtual networks in a cloud environment.
.png?width=200&name=Summit%20Security%20Summary%20(5).png)